React Native 시작
개발 환경 설정
Window(윈도우)
윈도우에서 리액트 네이티브를 개발하기 위해선 노드(Node), 파이썬(Python), 안드로이드 스튜디오 등을 설치해야 한다.
리액트 네이티브는 ios, 안드로이드(android) 각각 개발 툴을 이용하여 배포하므로 윈도우 환경에선 ios 모바일 앱은 배포가 불가능 하다. (ios의 경우 맥(mac) OS의 Xcode 툴이 반드시 필요하다.)
안드로이드
1. 안드로이드 스튜디오 설치
2. 안드로이드 SDK 설치
- - 2.1 Tools > SDK Manager.
- - 2.2 SDK Platforms 탭에서 원하는 플랫폼 선택 후 설치
- - 2.3 SDK Tools 탭에서 Google Play Licensing Library 설치
3. Viturl Device 설치
버추얼 디바이스를 사용하여 개발 할 경우 설치
- - 2.1 Tools > AVD Manager.
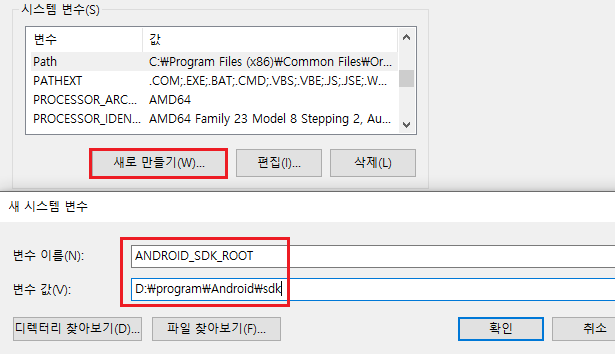
4.ANDROID_SDK_ROOT 환경 변수 설정
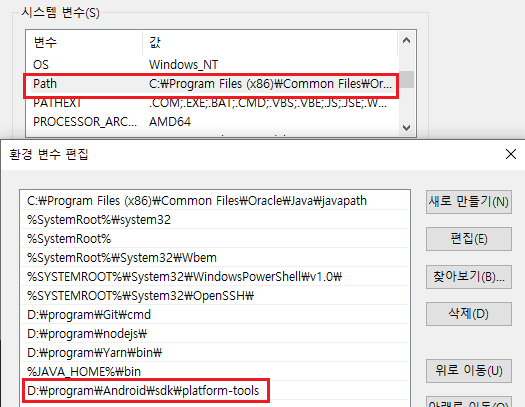
5. adb 환경 변수 설정
6. 리액트 네이티브 설치
$ yarn global add react-native-cli
MAC(맥)
IOS
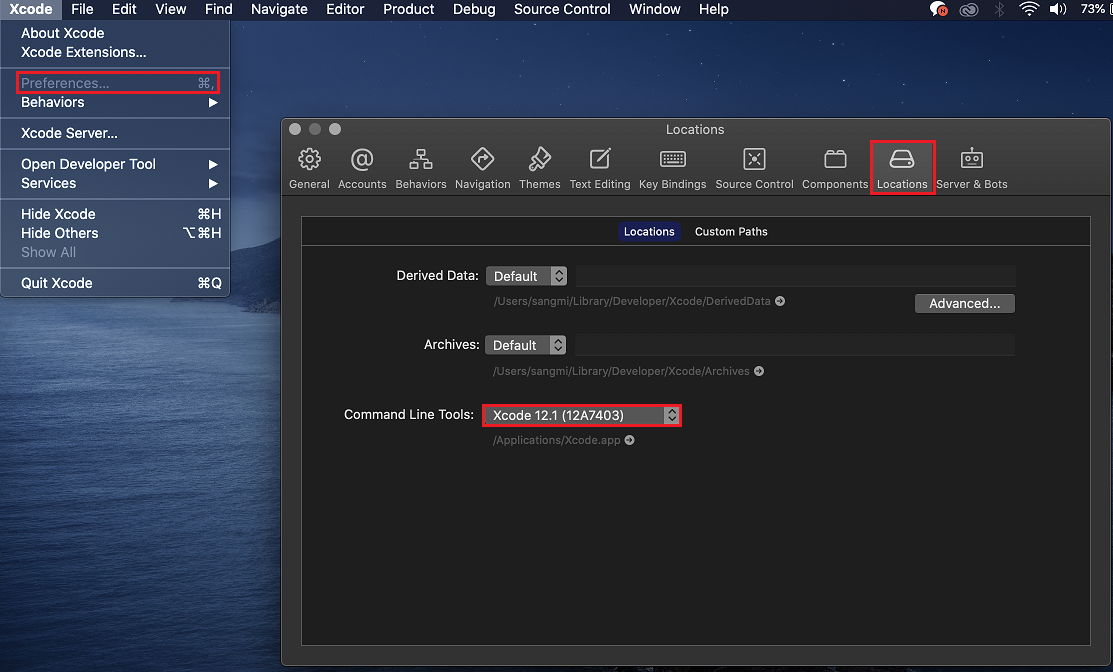
1.Xcode 설치
Xcode > Preferences > Locations 로 이동해서 아래와 같이 Command Line Tools의 설정을 확인한다.
2.Cocoapods 설치
Cocoapods는 iOS 개발에 사용되는 의존성 관리자이다.
$ sudo gem install cocoapods
...
// 설치 완료 후
$ pod --version
3. 리액트 네이티브 설치
$ yarn global add react-native-cli
안드로이드
1. 안드로이드 스튜디오 설치
2. 안드로이드 환경변수 설정
~/.bash_profile 파일을 아래와 같이 수정한다.
export ANDROID_HOME=안드로이드SDK/Android/sdk
export PATH=$PATH:$ANDROID_HOME/emulator
export PATH=$PATH:$ANDROID_HOME/tools
export PATH=$PATH:$ANDROID_HOME/tools/bin
export PATH=$PATH:$ANDROID_HOME/platform-tools
alias 적용
source ~/.bash_profile
테스트
adb version
프로젝트 생성 및 실행
프로젝트 생성
$ react-native init <프로젝트명>
애뮬레이터 실행
// 캐시 삭제 후 실행
$ yarn start --reset-cache //

// 안드로이드
$ yarn start android
$ react-native run-android

// IOS
$ yarn start ios
$ react-native run-ios

$ npx react-native run-ios --simulator="iPhone 8"
$ npx react-native run-ios --simulator="iPhone 8 Plus"
$ npx react-native run-ios --simulator="iPhone 11"
$ npx react-native run-ios --simulator="iPhone 11 Pro"
$ npx react-native run-ios --simulator="iPhone 11 Pro Max"
$ npx react-native run-ios --simulator="iPhone SE (2nd generation)"
$ npx react-native run-ios --simulator="iPhone 12 mini"
$ npx react-native run-ios --simulator="iPhone 12"
$ npx react-native run-ios --simulator="iPhone 12 Pro"
$ npx react-native run-ios --simulator="iPhone 12 Pro Max"
$ npx react-native run-ios --simulator="iPod touch (7th generation)"
$ npx react-native run-ios --simulator="iPad Pro (9.7-inch)"
$ npx react-native run-ios --simulator="iPad Pro (11-inch) (2nd generation)"
$ npx react-native run-ios --simulator="iPad Pro (12.9-inch) (4th generation)"
$ npx react-native run-ios --simulator="iPad (8th generation)"
$ npx react-native run-ios --simulator="iPad Air (4th generation)"
설정
CSS
StyleSheet
import React from "react";
import { ActivityIndicator, View, StyleSheet } from "react-native";
import { TINT_COLOR, BG_COLOR } from "../constants/Colors";
const styled = StyleSheet.create.create({
container: {
backgroundColor: "black",
flex: 1,
justifyContent:"space-around"
}
});
export default () => (
<View style={styled.container}>
<ActivityIndicator color={TINT_COLOR} />
</View>
);
styled-components
import React from "react";
import { ActivityIndicator } from "react-native";
import { TINT_COLOR, BG_COLOR } from "../constants/Colors";
import styled from "styled-components";
const Container = styled.View`
flex: 1;
background-color: ${BG_COLOR};
justify-content: center;
`;
export default () => (
<Container>
<ActivityIndicator color={TINT_COLOR} />
</Container>
);
구조
SafeAreaView
아이폰 X와 같은 노치 디자인(Notch Design)에서 상단에 상태 바와 하단에 홈 버튼의 영역을 제외한 영역에 콘텐츠를 표시할 때 사용하는 컴포넌트